2024年10月28日月曜日

Show weather reports OLED(SSD1306) with Raspberry Pi

Raspberry Pi Zero W Rev 1.1にinstallしたRaspberry pi OS 12 (bookworm) の動作確認です

OLED(SSD1306)に天気情報を流すPython scriptを書いてみた。


ベースのコードは、Adafruit_CircuitPython_SSD1306 の/examples/ssd1306_pillow_animate.py

# pip install adafruit-circuitpython-ssd1306
# pip install pillow
# git clone https://github.com/adafruit/Adafruit_CircuitPython_SSD1306

fontは、IPAフォントを使用
#apt install fonts-ipaexfont

[p3-ssd1306_pillow_animate_weather-flat-24.py]

#!/usr/bin/env python
# -*- coding:utf-8 -*

# SPDX-FileCopyrightText: 2014 Tony DiCola for Adafruit Industries
# SPDX-License-Identifier: MIT

# This example is for use on (Linux) computers that are using CPython with
# Adafruit Blinka to support CircuitPython libraries. CircuitPython does
# not support PIL/pillow (python imaging library)!

import math
import time
from board import SCL, SDA
import busio
from PIL import Image, ImageDraw, ImageFont
import adafruit_ssd1306

#####
import local_weather

def text_get():

   text=local_weather.get_weather()
   return text


#####
text=text_get()

font = ImageFont.truetype("fonts-japanese-gothic.ttf", 24)

# Create the I2C interface.
i2c = busio.I2C(SCL, SDA)

# Create the SSD1306 OLED class.
# The first two parameters are the pixel width and pixel height.
# Change these to the right size for your display!
disp = adafruit_ssd1306.SSD1306_I2C(128, 32, i2c)

# Note you can change the I2C address, or add a reset pin:
# disp = adafruit_ssd1306.SSD1306_I2C(128, 32, i2c, addr=0x3c, reset=reset_pin)

# Get display width and height.
width = disp.width
height = disp.height

# Clear display.
disp.fill(0)
disp.show()

# Create image buffer.
# Make sure to create image with mode '1' for 1-bit color.
image = Image.new("1", (width, height))

# Load default font.
###org## font = ImageFont.load_default()

# Alternatively load a TTF font.  Make sure the .ttf font file is in the
# same directory as this python script!
# Some nice fonts to try: http://www.dafont.com/bitmap.php
# font = ImageFont.truetype('Minecraftia.ttf', 8)

# Create drawing object.
draw = ImageDraw.Draw(image)

# Define text and get total width.
##text = (
##    "SSD1306 ORGANIC LED DISPLAY. THIS IS AN OLD SCHOOL DEMO SCROLLER!!"
##    + "GREETZ TO: LADYADA & THE ADAFRUIT CREW, TRIXTER, FUTURE CREW, AND FARBRAUSCH"
##)
bbox = draw.textbbox((0, 0), text, font=font)
maxwidth = bbox[2] - bbox[0]

# Set animation and sine wave parameters.
amplitude = height / 4
offset = height / 2 - 4
velocity = -2
startpos = width

# Animate text moving in sine wave.
print("Press Ctrl-C to quit.")
pos = startpos
while True:
    # Clear image buffer by drawing a black filled box.
    draw.rectangle((0, 0, width, height), outline=0, fill=0)
    # Enumerate characters and draw them offset vertically based on a sine wave.
    x = pos
    for i, c in enumerate(text):
        # Stop drawing if off the right side of screen.
        if x > width:
            break
        # Calculate width but skip drawing if off the left side of screen.
        if x < -10:
            bbox = draw.textbbox((0, 0), c, font=font)
            char_width, char_height = bbox[2] - bbox[0], bbox[3] - bbox[1]
            x += char_width
            continue
        # Calculate offset from sine wave.
##org        y = offset + math.floor(amplitude * math.sin(x / float(width) * 2.0 * math.pi))
        # Draw text.
##        draw.text((x, y), c, font=font, fill=255)
##      append by pi 2924/9  flat!! fstart
        y=0
##      append by pi 2924/9  end
        draw.text((x, y), c, font=font, fill=255)
        # Increment x position based on chacacter width.
        bbox = draw.textbbox((0, 0), c, font=font)
        char_width, char_height = bbox[2] - bbox[0], bbox[3] - bbox[1]
        x += char_width

    # Draw the image buffer.
    disp.image(image)
    disp.show()

    # Move position for next frame.
    pos += velocity
    # Start over if text has scrolled completely off left side of screen.
    if pos < -maxwidth:
        pos = startpos

    # Pause briefly before drawing next frame.
####    time.sleep(0.001)

[local_weather.py]

#!/usr/bin/env python3
# -*- coding: utf-8 -*-

import re
import json
import requests

#import sys
#sys.dont_write_bytecode = True

def get_weather():
#  url = 'http://weather.livedoor.com/forecast/webservice/json/v1'
  url = 'https://weather.tsukumijima.net/api/forecast'
  # 東京のcityタグのid
  payload = {'city': '130010'}
  # お天気情報をjsonで取得
  try:
     data = requests.get(url, params = payload).json()
  except Exception as e:
#     return e
     return '天気情報がありません'


  # 天気情報をedit
  rt=''
  max_len=len(data['forecasts'])
# 今日、明日、(明後日)の情報
  for forecast in data['forecasts']:
     rt+=('{0} ({1}) '.format(forecast['date'], forecast['dateLabel']))
     rt+=(' {} '.format(forecast['telop']))
     if forecast['temperature'].get('max') is not None:
        rt+= ('最高気温 {}℃  '.format(forecast['temperature']['max']['celsius']))
        rt+= ('最高湿度 {}% '.format(forecast['temperature']['max']['fahrenheit']))
     if forecast['temperature'].get('min') is not None:
        rt+= (' 最低気温 {}℃  '.format(forecast['temperature']['min']['celsius']))
        rt+= (' 最低湿度 {}% '.format(forecast['temperature']['min']['fahrenheit']))
     rt += ('{}の天気は、{}でしょう '.format(forecast['dateLabel'], forecast['telop']))

  rt+=('以降が{}の天気概況 '.format(data['location']['city']))
  rt+=(' ' + data['description']['text'])
  rt=re.sub(r'\n|。|、', "", rt)
  return rt

if __name__ == '__main__':
   rt=get_weather()
   print(rt)


2024年9月17日火曜日

Raspberry pi OS 12 (bookworm) で wifi Power Management:on になってる

 Raspberry pi OS 12 (bookworm) のinstall 確認用に、中古のRaspberry Pi Zero W Rev 1.1 を入手して、インストールメディア作成して

power on 起動になかなか時間がかかる、リモートでやっと繋がったと思うとすぐ無反応になる

これは、大昔に経験した事象だったかなと思い、

iwconfig コマンド打つと、Power Management:on だと、

しょうがないので、NetworkManager とか訳のわからんものは使ってないので、潔く、/etc/network/interface に wireless-power off を追加する

再起動で、普通にリモート接続出来るようになりました

Pi Zero Wって標準では、wifiしかないんですがね。不思議なことに 1B plus はドングルのwifiはPower Management:offだったけどね


2024年9月14日土曜日

Raspberry pi OS 12 (bookworm) で NetworkManager を使用しない

Raspberry Pi OS が bookworm の場合は、NetworkManager が標準ですが、

Redhat系で、過去に使いにくさを経験してたので、

古来からの(?) /etc/network/interfaces  の設定に変更しました

1. interfacesファイルの作成

# cat interfaces

#wpa-roam /etc/wpa_supplicant/wpa_supplicant.conf

#iface default inet dhcp

allow-hotplug wlan0

auto wlan0

#iface wlan0 inet dhcp

iface wlan0 inet static

        address 192.168.xxx.yyy

        netmask 255.255.255.0

        gateway 192.168.xxx.yyy

wpa-ssid "xxxx"

wpa-psk "ppppp"

dns-nameservers 192.168.xxx.yyy

iface wlan1 inet static

        address 192.168.xxx.yyy

        netmask 255.255.255.0

        gateway 192.168.xxx.yy

wpa-ssid "xxxxx"

wpa-psk "ppppp"

auto lo

iface lo inet loopback

auto eth0

iface eth0 inet static

        address 192.168.xxx.yyy

        netmask 255.255.255.0

        gateway 192.168.xxx.yy

dns-nameservers 192.168.xxx.yy

2. NetworkManagerの無効化及び停止

   sudo systemctl disable NetworkManager

   sudo systemctl stop NetworkManager

3. resolv.confの手動設定

 # cat resolv.conf

   # Generated by NetworkManager

    nameserver 192.168.xxx.yy

4. reboot

  以上


2024年1月6日土曜日

久々にネジザウルス使う 感動

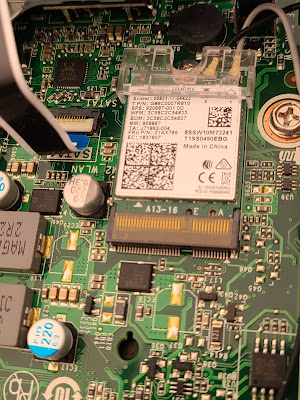
 ThinkCentre M75q-1 Tiny の

WiFi 5 モジュール(intel Wireless-AC 9260)を交換(ダウングレード)しようとして

見た目ちょっとやばそうな螺子だなと思ったんだが他で実績のあるドライバーで

回すと、どんどんなめていく。。

おまけに、余計なアンテナ端子ガードが付いてて、ネジザウルス使うのに邪魔

そのガードをやっと外して、

さら螺子だったけどネジザウルスでするすると廻った

のに感動です!!


2023年11月30日木曜日

Wifi Card Replacement Lenovo Thinkpad L390 from AC-9560 to Wi-Fi 6E AX210 OK!!

Thinkpad L390ですが、

 ネットで調べても、

CNVi対応の無線LANカードモジュールしか使えないとの情報はあるんですが、

非CNViカード(Eキーだけ、Aキーなし)が使えたとの情報がありませんね。


試してみました。

何の問題も無く使えましたね。

AX対応のルーターに接続出来ました。

リンク速度: 1201(Mbps)     でした。

2023年3月6日月曜日

Sockets not releasing for Pico_W

 https://github.com/micropython/micropython/issues/10812

の方と同様の現象発生で、昨日悩まされてました。

You need to close the waiting (bound on port 80) socket, otherwise you won't be able to make a new one on the same port.

しょうがないので、とりあえず、bind(addr)を正常終了までリトライするコード

に変えてみました。

以下、コード例

....

# Open socket

addr = socket.getaddrinfo('0.0.0.0', 80)[0][-1]

s = socket.socket()

##s.bind(addr)

bs="addr"

ec=0

while bs!=None:

  try:

    bs=s.bind(addr)

  except OSError:

    ec=ec+1

    print("EADDRINUSE?? " + str(ec))

  utime.sleep(1)

  print('s.bind(addr) rt ', bs)

s.listen(1)

print('listening on', addr)

....

とりあえず、

最悪でも、2分以内に、bind出来た。。


2023年2月22日水曜日

micro:bit V1 でちょっと遊ぶ

 昨年の暮れぐらいからマイコンの整理を始めてました。結局Arduino系は、ブートローダーの最新化で、殆ど動いたので(20台位)、結局塵は減らない。
ごく最近、箱の中で眠っていたmicro:bit V1 を発見!!  
Micropython を最新化してちょっと遊んでみました。今更面白いと思うのはボケて来たせい?!
入時(2017年らしい)は、ちょっと触って、うーん(!?)でお蔵入りでした。
今回、
micro:bit用エッジコネクタピッチ変換基板 など入手して、ちょっと遊んでみました。
(note pc 用の小さいスピーカーを付けられるように)

[サンプルコード]

from microbit import *
import speech
from math import floor
i2c.init(freq=100000, sda=pin20, scl=pin19)
#i2c.scan()
def temp_get():
  o=i2c.read(0x48, 2)
  point=floor(int(o[1]) / 23)
  #print("%s.%s" % (o[0], point))
  temp=("%s.%s") % (o[0], point)
  print (temp)
  return temp
while True:
    temp=temp_get()
    display.show(Image.HEART)
    sleep(1000)
#    display.scroll('Hello')
    display.scroll(temp)
#    speech.say("Konnithiwa")
    speech.say(temp)

LM75温度センサから値を取得して、マトリックスLEDでスクロール
と読み上げ
但し、LM75からの値取得が正しいのか否かは不明です。


2022年12月13日火曜日

Raspberry Pi 3A+ buster 2 bullseye upgrade

 Raspberry Pi 3A+  のOS bullseye(11)に上げました。

いまのところ殆ど問題ないですね。意外!?

[before]

# uname -a

Linux raspi3ap 5.10.103-v7+ #1529 SMP Tue Mar 8 12:21:37 GMT 2022 armv7l GNU/Linux

root@raspi3ap:~# pip3 list

Package                          Version

-------------------------------- -------

Adafruit-Blinka                  3.4.1

adafruit-circuitpython-busdevice 4.1.1

adafruit-circuitpython-ht16k33   2.8.0

Adafruit-GPIO                    1.0.3

Adafruit-PlatformDetect          1.4.4

Adafruit-PureIO                  1.0.4

Adafruit-SSD1306                 1.6.2

..# ps axg|grep python3

 1300 ?        S      0:00 python3 /home/pi/bin/p3-led0-G22.py

 1301 ?        S      0:00 python3 /home/pi/bin/stats3-p3.py

 1302 ?        Sl     0:00 python3 /home/pi/bin/p3-pwm_fan_ctrl321.py

 1303 ?        S      0:00 python3 /home/pi/bin/p3-tm1637_ab_time_temp.py

/etc/apt/sources.list を書き替え.buster を bullseye に

#apt update

#apt full-upgrade


[after]

# uname -a

Linux raspi3ap 5.15.76-v7+ #1597 SMP Fri Nov 4 12:13:17 GMT 2022 armv7l GNU/Linux

# cat /etc/os-release

PRETTY_NAME="Raspbian GNU/Linux 11 (bullseye)"

NAME="Raspbian GNU/Linux"

VERSION_ID="11"


# pip3 install Adafruit-Blinka

# pip3 install adafruit-circuitpython-ht16k33

# pip3 install Adafruit-SSD1306

root@raspi3ap:/home/shin/bin# pip3 list

Package                          Version

-------------------------------- ---------

Adafruit-Blinka                  8.9.0

adafruit-circuitpython-busdevice 5.2.3

adafruit-circuitpython-ht16k33   4.6.1

adafruit-circuitpython-requests  1.12.11

adafruit-circuitpython-typing    1.8.3

Adafruit-GPIO                    1.0.3

Adafruit-PlatformDetect          3.37.0

Adafruit-PureIO                  1.1.9

Adafruit-SSD1306                 1.6.2


-----------------------

root@raspi3ap:~# ps axg|grep python

 1095 ?        S      0:00 python3 /home/pi/bin/p3-led0-G22.py

 1096 ?        S      0:00 python3 /home/pi/bin/stats3-p3.py

 1097 ?        Sl     0:00 python3 /home/pi/bin/p3-pwm_fan_ctrl321.py

 1098 ?        S      0:00 python3 /home/pi/bin/p3-tm1637_ab_time_temp.py

-------------------------

スクロールが速すぎるので(ライブラリの性能アップ?!)、timeを挿入が必要になった

root@raspi3ap:/home/pi/bin# tail ./matrix16x8_xx24_heike_scroll.py

max_addr=len(i2c_address)

for i in range(0, max_addr):

  image_listx.append( horizontal_multi_scroll(matrixx[0], new_image, max_addr, i))

max_images = len(image_listx[0])

while True:

    for i in range(0, max_images):

         for j, m in enumerate(matrixx, 0):

            m.image(image_listx[j][i])

         time.sleep(0.10)            #### <====これを追加する!!!


2022年12月12日月曜日

Raspberry Pi 4 buster 2 bullseye SSD1306 Could not determine platform

Raspberry Pi 4 のOS bullseye(11)に上げたら、やっぱり問題でましたね。

root@raspi4:~# cat /etc/os-release

PRETTY_NAME="Raspbian GNU/Linux 10 (buster)"

root@raspi4:~# pip3 list

Package          Version

---------------- -------

Adafruit-BBIO    1.2.0

Adafruit-GPIO    1.0.4

Adafruit-PureIO  1.1.5

Adafruit-SSD1306 1.6.2

root@raspi4:~# ps axg|grep python

  535 ?        S      0:00 python3 /home/pi/bin/led0-G22-p3.py

  536 ?        S      0:00 python3 /home/pi/bin/stats2-p3.py

  867 ?        Ssl    0:01 /usr/bin/python3 /root/fanshim-python/examples/automatic.py --on-threshold 50 --off-threshold 45 --low-temp 45 --high-temp 50 --delay 2 --brightness 255

[bullseye に変更]

/etc/apt/sources.list をbuster を bullseye に変更

#apt update

#apt full-upgrade

再起動

root@raspi4:~# ps axg|grep python

  549 ?        S      0:00 python3 /home/pi/bin/led0-G22-p3.py

python3 /home/pi/bin/stats2-p3.py が居ない!!!!

起動すると以下pkg無しのエラーとなる。

Python3の ver.upで色々不足かな

# pip3 install Adafruit_GPIO

# pip3 install Adafruit_SSD1306

# pip3 install pillow

で、起動してみると

# ./stats2-p3.py

Traceback (most recent call last):

  File "/home/pi/bin/./stats2-p3.py", line 41, in <module>

    disp = Adafruit_SSD1306.SSD1306_128_64(rst=RST, i2c_address=0x3C)

  File "/usr/local/lib/python3.9/dist-packages/Adafruit_SSD1306/SSD1306.py", line 242, in __init__

    super(SSD1306_128_64, self).__init__(128, 64, rst, dc, sclk, din, cs,

  File "/usr/local/lib/python3.9/dist-packages/Adafruit_SSD1306/SSD1306.py", line 85, in __init__

    self._gpio = GPIO.get_platform_gpio()

  File "/usr/local/lib/python3.9/dist-packages/Adafruit_GPIO/GPIO.py", line 426, in get_platform_gpio

    raise RuntimeError('Could not determine platform.')

RuntimeError: Could not determine platform.


1.0.3/1.0.4 のPlatform.py だと rpi4が対象外になりますな。

rpi4は、Hardware  : BCM2711 ですね。

def pi_version():

    """Detect the version of the Raspberry Pi.  Returns either 1, 2 or

    None depending on if it's a Raspberry Pi 1 (model A, B, A+, B+),

    Raspberry Pi 2 (model B+), or not a Raspberry Pi.

    """

    # Check /proc/cpuinfo for the Hardware field value.

    # 2708 is pi 1

    # 2709 is pi 2

    # 2835 is pi 3 on 4.9.x kernel

    # Anything else is not a pi.

    with open('/proc/cpuinfo', 'r') as infile:

        cpuinfo = infile.read()

    # Match a line like 'Hardware   : BCM2709'

    match = re.search('^Hardware\s+:\s+(\w+)$', cpuinfo,

                      flags=re.MULTILINE | re.IGNORECASE)

    if not match:

        # Couldn't find the hardware, assume it isn't a pi.

        return None

    if match.group(1) == 'BCM2708':

        # Pi 1

        return 1

    elif match.group(1) == 'BCM2709':

        # Pi 2

        return 2

    elif match.group(1) == 'BCM2835':

        # Pi 3 / Pi on 4.9.x kernel

        return 3

    else:

        # Something else, not a pi.

        return 

OS updateする前のBuster(10)でもコードは同じだったみたいですがね。

まぁ。

circuitpython に変えましょう。。。。

#pip3 install adafruit-circuitpython-ssd1306

依存pkgも入れる。(省略)

# pip3 list

Package                                  Version

---------------------------------------- ---------

Adafruit-Blinka                          8.9.0

adafruit-circuitpython-busdevice         5.2.3

adafruit-circuitpython-displayio-ssd1306 1.5.11

adafruit-circuitpython-framebuf          1.4.14

adafruit-circuitpython-requests          1.12.11

adafruit-circuitpython-ssd1306           2.12.12

adafruit-circuitpython-typing            1.8.3

とりあえず、動きました。

[sample acript]

#!/usr/bin/env python3

import time

import subprocess

from board import SCL, SDA

import busio

from PIL import Image, ImageDraw, ImageFont

import adafruit_ssd1306

i2c = busio.I2C(SCL, SDA)

disp = adafruit_ssd1306.SSD1306_I2C(128, 64, i2c)

disp.fill(0)

disp.show()

width = disp.width

height = disp.height

image = Image.new("1", (width, height))

draw = ImageDraw.Draw(image)

draw.rectangle((0, 0, width, height), outline=0, fill=0)

padding = -2

top = padding

bottom = height - padding

x = 0

font = ImageFont.load_default()

while True:

    draw.rectangle((0, 0, width, height), outline=0, fill=0)

    cmd = "hostname -I | cut -d' ' -f1"

    IP = subprocess.check_output(cmd, shell=True).decode("utf-8")

    cmd = 'cut -f 1 -d " " /proc/loadavg'

    CPU = subprocess.check_output(cmd, shell=True).decode("utf-8")

    cmd = "free -m | awk 'NR==2{printf \"Mem: %s/%s MB  %.2f%%\", $3,$2,$3*100/$2 }'"

    MemUsage = subprocess.check_output(cmd, shell=True).decode("utf-8")

    cmd = 'df -h | awk \'$NF=="/"{printf "Disk: %d/%d GB  %s", $3,$2,$5}\''

    Disk = subprocess.check_output(cmd, shell=True).decode("utf-8")

    cmd = "uptime -p"

    Uptime = subprocess.check_output(cmd, shell = True )

    cmd = "vcgencmd measure_temp"

    CPU_TEMP = subprocess.check_output(cmd, shell = True )


    cmd = " iwconfig wlan0|head -1 |cut -f 2 -d \':\'"

    ESSID = subprocess.check_output(cmd, shell = True )

    cmd = "cpufreq-info -f -m"

    CPU_FREQ = subprocess.check_output(cmd, shell = True )

    draw.text((x, top + 0), "IP: " + IP, font=font, fill=255)

    draw.text((x, top + 8), "CPU load: " + CPU, font=font, fill=255)

    draw.text((x, top + 16), MemUsage, font=font, fill=255)

    draw.text((x, top + 25), Disk, font=font, fill=255)

    draw.text((x, top+34),    str(Uptime.decode('utf-8')),  font=font, fill=255)

    draw.text((x, top+43),    "CPU " + str(CPU_TEMP.decode('utf-8')),  font=font, fill=255)

    draw.text((x, top+52),    "CPU frq=" + str(CPU_FREQ.decode('utf-8')),  font=font, fill=255)

    # Display image.

    disp.image(image)

    disp.show()

    time.sleep(0.1)


2022年11月30日水曜日

Raspberry Pi でOLEDにmpd 曲名を追加(Python3 ver.) 曲名full test ver.

長い曲名の後半が表示されてない問題への、とりえずの対応版です。

長い場合は、次行に表示するように試みる。


#!/usr/bin/env python3

import os

import os.path

import re

#

import time

import Adafruit_GPIO.SPI as SPI

import Adafruit_SSD1306


from PIL import Image

from PIL import ImageDraw

from PIL import ImageFont

import subprocess

# Raspberry Pi pin configuration:

RST = 24

# Note the following are only used with SPI:

DC = 23

SPI_PORT = 0

SPI_DEVICE = 0

# Beaglebone Black pin configuration:

# RST = 'P9_12'

# Note the following are only used with SPI:

# DC = 'P9_15'

# SPI_PORT = 1

# SPI_DEVICE = 0

# 128x32 display with hardware I2C:

##disp = Adafruit_SSD1306.SSD1306_128_32(rst=RST)

# 128x64 display with hardware I2C:

# disp = Adafruit_SSD1306.SSD1306_128_64(rst=RST)

# Note you can change the I2C address by passing an i2c_address parameter like:

disp = Adafruit_SSD1306.SSD1306_128_64(rst=RST, i2c_address=0x3C)

# Alternatively you can specify an explicit I2C bus number, for example

# with the 128x32 display you would use:

# disp = Adafruit_SSD1306.SSD1306_128_32(rst=RST, i2c_bus=2)

# 128x32 display with hardware SPI:

# disp = Adafruit_SSD1306.SSD1306_128_32(rst=RST, dc=DC, spi=SPI.SpiDev(SPI_PORT, SPI_DEVICE, max_speed_hz=8000000))

# 128x64 display with hardware SPI:

# disp = Adafruit_SSD1306.SSD1306_128_64(rst=RST, dc=DC, spi=SPI.SpiDev(SPI_PORT, SPI_DEVICE, max_speed_hz=8000000))

# Alternatively you can specify a software SPI implementation by providing

# digital GPIO pin numbers for all the required display pins.  For example

# on a Raspberry Pi with the 128x32 display you might use:

# disp = Adafruit_SSD1306.SSD1306_128_32(rst=RST, dc=DC, sclk=18, din=25, cs=22)

# Initialize library.

disp.begin()

# Clear display.

disp.clear()

disp.display()

# Create blank image for drawing.

# Make sure to create image with mode '1' for 1-bit color.

width = disp.width

height = disp.height

image = Image.new('1', (width, height))

# Get drawing object to draw on image.

draw = ImageDraw.Draw(image)

# Draw a black filled box to clear the image.

draw.rectangle((0,0,width,height), outline=0, fill=0)

# Draw some shapes.

# First define some constants to allow easy resizing of shapes.

padding = -2

top = padding

bottom = height-padding

# Move left to right keeping track of the current x position for drawing shapes.

x = 0

# Load default font.

font = ImageFont.load_default()

## font2

#font = ImageFont.truetype('/home/hogehoge/font/misakifont/misaki_gothic.ttf', 8, encoding='unic')

font2 = ImageFont.truetype('/home/hogehoge/font/misakifont/misaki_gothic.ttf', 8, encoding='unic')

# Alternatively load a TTF font.  Make sure the .ttf font file is in the same directory as the python script!

# Some other nice fonts to try: http://www.dafont.com/bitmap.php

# font = ImageFont.truetype('Minecraftia.ttf', 8)

while True:

    # Draw a black filled box to clear the image.

    draw.rectangle((0,0,width,height), outline=0, fill=0)

    # Shell scripts for system monitoring from here : https://unix.stackexchange.com/questions/119126/command-to-display-memory-usage-disk-usage-and-cpu-load

    cmd = "hostname -I | cut -d\' \' -f1"

    IP = subprocess.check_output(cmd, shell = True )

    cmd = "top -bn1 | grep load | awk '{printf \"CPU Load: %.2f\", $(NF-2)}'"

    CPU = subprocess.check_output(cmd, shell = True )

    cmd = "free -m | awk 'NR==2{printf \"Mem: %s/%sMB %.2f%%\", $3,$2,$3*100/$2 }'"

    MemUsage = subprocess.check_output(cmd, shell = True )

    cmd = "df -h | awk '$NF==\"/\"{printf \"Disk: %d/%dGB %s\", $3,$2,$5}'"

    Disk = subprocess.check_output(cmd, shell = True )

    cmd = "uptime -p"

    Uptime = subprocess.check_output(cmd, shell = True )

    cmd = "mpc current"

    FullSongName = subprocess.check_output(cmd, shell = True )

    fo=os.path.basename(FullSongName)

    f=fo.decode('utf-8')

    regexp = re.compile("^[0-9]+ +|^[0-9]+-")

    if f=='':

       SongName=''

    else:

       fn, ext = os.path.splitext(f)

       pre = regexp.search(fn)

       if pre is None:

          SongName=fn

       else:

          SongName=fn.replace(pre.group(), "")

    # Write two lines of text.

    draw.text((x, top),       "IP: " + str(IP.decode('utf-8')),  font=font, fill=255)

    draw.text((x, top+8),    "CPU " + str(CPU.decode('utf-8')),  font=font, fill=255)

    draw.text((x, top+16),    str(MemUsage.decode('utf-8')),  font=font, fill=255)

#    draw.text((x, top+25),    str(Disk),  font=font, fill=255)

    draw.text((x, top+25),    str(Disk.decode('utf-8')),  font=font, fill=255)

    draw.text((x, top+34),    str(Uptime.decode('utf-8')),  font=font, fill=255)

    if SongName.isascii():

       draw.text((x, top+43),    SongName[0:32],  font=font2, fill=255)

    else:

       draw.text((x, top+43),    SongName[0:17],  font=font2, fill=255)

# 32 char display

    if SongName.isascii():

      draw.text((x, top+52),    SongName[32:],  font=font2, fill=255)

    else:

      draw.text((x, top+52),    SongName[17:],  font=font2, fill=255)

    # Display image.

    disp.image(image)

    disp.display()

#    time.sleep(.1)

    time.sleep(30)

2022年11月28日月曜日

Raspberry Pi でOLEDにmpd 曲名を追加(Python3 ver.)


Adafruit_Python_SSD1306
のサンプルスクリプトstats.pyにmpd の曲名を追加してみました Python3 ver.

Python2 も終わったので3対応かな。OSのver. upは未だですが。
(新しいmicroSD card未入手)


# apt install python3-pip
# pip3 install Adafruit-SSD1306
# pip3 install RPi.GPIO  <--- 必要か不明?!
# pip3 install pillow

[python script ]

#!/usr/bin/env python3

import os
import os.path
import re

import time

import Adafruit_GPIO.SPI as SPI
import Adafruit_SSD1306

from PIL import Image
from PIL import ImageDraw
from PIL import ImageFont

import subprocess

# Raspberry Pi pin configuration:
RST = 24
# Note the following are only used with SPI:
DC = 23
SPI_PORT = 0
SPI_DEVICE = 0


# Note you can change the I2C address by passing an i2c_address parameter like:
disp = Adafruit_SSD1306.SSD1306_128_64(rst=RST, i2c_address=0x3C)

# Initialize library.
disp.begin()

# Clear display.
disp.clear()
disp.display()

# Create blank image for drawing.
# Make sure to create image with mode '1' for 1-bit color.
width = disp.width
height = disp.height
image = Image.new('1', (width, height))

# Get drawing object to draw on image.
draw = ImageDraw.Draw(image)

# Draw a black filled box to clear the image.
draw.rectangle((0,0,width,height), outline=0, fill=0)

# Draw some shapes.
# First define some constants to allow easy resizing of shapes.
padding = -2
top = padding
bottom = height-padding
# Move left to right keeping track of the current x position for drawing shapes.
x = 0


# Load default font.
font = ImageFont.load_default()

## font2

font2 = ImageFont.truetype('/home/hogehoge/font/misakifont/misaki_gothic.ttf', 8, encoding='unic')

# Alternatively load a TTF font.  Make sure the .ttf font file is in the same directory as the python script!
# Some other nice fonts to try: http://www.dafont.com/bitmap.php
# font = ImageFont.truetype('Minecraftia.ttf', 8)

while True:

    # Draw a black filled box to clear the image.
    draw.rectangle((0,0,width,height), outline=0, fill=0)

    # Shell scripts for system monitoring from here : https://unix.stackexchange.com/questions/119126/command-to-display-memory-usage-disk-usage-and-cpu-load
    cmd = "hostname -I | cut -d\' \' -f1"
    IP = subprocess.check_output(cmd, shell = True )
    cmd = "top -bn1 | grep load | awk '{printf \"CPU Load: %.2f\", $(NF-2)}'"
    CPU = subprocess.check_output(cmd, shell = True )
    cmd = "free -m | awk 'NR==2{printf \"Mem: %s/%sMB %.2f%%\", $3,$2,$3*100/$2 }'"
    MemUsage = subprocess.check_output(cmd, shell = True )
    cmd = "df -h | awk '$NF==\"/\"{printf \"Disk: %d/%dGB %s\", $3,$2,$5}'"
    Disk = subprocess.check_output(cmd, shell = True )
#
    cmd = "uptime -p"
    Uptime = subprocess.check_output(cmd, shell = True )

    cmd = "mpc current"
    FullSongName = subprocess.check_output(cmd, shell = True )

    fo=os.path.basename(FullSongName)
    f=fo.decode('utf-8')
    regexp = re.compile("^[0-9]+ +|^[0-9]+-")
    if f=='':
       SongName=''
    else:
       fn, ext = os.path.splitext(f)
       pre = regexp.search(fn)
       if pre is None:
          SongName=fn
       else:
          SongName=fn.replace(pre.group(), "")

    # Write two lines of text.
    draw.text((x, top),       "IP: " + str(IP.decode('utf-8')),  font=font, fill=255)
    draw.text((x, top+8),    "CPU " + str(CPU.decode('utf-8')),  font=font, fill=255)
    draw.text((x, top+16),    str(MemUsage.decode('utf-8')),  font=font, fill=255)
    draw.text((x, top+25),    str(Disk.decode('utf-8')),  font=font, fill=255)
    draw.text((x, top+34),    str(Uptime.decode('utf-8')),  font=font, fill=255)
    draw.text((x, top+43),    SongName,  font=font2, fill=255)
   # Display image.
    disp.image(image)
    disp.display()
    time.sleep(30)

2022年11月17日木曜日

Raspberry Pi Zero Again(4) lirc(Debian 11(Bullseye) base)

 赤外線リモコン用の設定を従来どおりしたのだが

使えない

よく見ると、必要なソフトがあがって無い!!

各種サービスがデフォルトで無効化されていた。

手動で、有効化及び起動した。このパッケージは変だーーーぞ

cd /lib/systemd/system

  systemctl enable lircd-setup.service

  systemctl start lircd-setup.service

  systemctl enable lircd-uinput.service

  systemctl start lircd-uinput.service

  systemctl enable lircmd.service

  systemctl start lircmd.service

  systemctl enable irexec.service

  systemctl start irexec.service

root@zeroxxx:/lib/systemd/system# ps axg|grep lirc

  499 ?        Ss     0:00 /usr/sbin/lircd --nodaemon

 1060 ?        Ss     0:00 /usr/sbin/lircd-uinput

 1121 ?        Ss     0:00 /usr/sbin/lircmd --nodaemon

 1147 ?        Ss     0:00 /usr/bin/irexec /etc/lirc/irexec.lircrc


これで、使えるようになった。

Raspberry Pi Zero Again(3) audio(Debian 11(Bullseye) base)

なかなか音源デバイスを認識しなくて困った。もともとH/W無いしね。。

/boot/config.txt

dtparam=audio=on

は必要

従来のver.ではOKだった

dtoverlay=pwm-2chan,pin2=13,func2=4

では、NG

で、

dtoverlay=audremap,swap_lr=pins_12_13

に変更してやっとハードウェアデバイスを認識するようになった。

ex)

root@zeroXXX:~# aplay -L

null

    Discard all samples (playback) or generate zero samples (capture)

hw:CARD=Headphones,DEV=0

    bcm2835 Headphones, bcm2835 Headphones

    Direct hardware device without any conversions

plughw:CARD=Headphones,DEV=0

    bcm2835 Headphones, bcm2835 Headphones

    Hardware device with all software conversions

default:CARD=Headphones

    bcm2835 Headphones, bcm2835 Headphones

    Default Audio Device

sysdefault:CARD=Headphones

    bcm2835 Headphones, bcm2835 Headphones

    Default Audio Device

dmix:CARD=Headphones,DEV=0

    bcm2835 Headphones, bcm2835 Headphones

    Direct sample mixing device 

Raspberry Pi Zero Again(2) wifi driver up(Debian 11(Bullseye) base)

 2016/3最初に取得したZeroは、2W位でusbデバイスを認識しなくなりました(初期不良orオペミスかは不明)

(有線10base/T のモジュールで繋げていた時期もありますが。。)

そこで出会ったのが、以下のサイトです。


ESP-12Fのwifi機能を使うプロジェクトです。

https://hackaday.io/project/8678/instructions

今回、久々にdriverが make出来ました。

以下、当該サイトのドキュメント通りですが (w/o HARDWARE setting )

# sh -c 'echo "dtoverlay=sdio,poll_once=off" >> /boot/config.txt'

reboot

# wget https://github.com/al177/esp8089/releases/download/1.9.20220717/esp8089-dkms_1.9.20220717_all.deb.gz

# gunzip esp8089-dkms_1.9.20220717_all.deb.gz

# dpkg -i esp8089-dkms_1.9.20220717_all.deb

# modprobe esp8089


/etc/modules への esp8089 追加も忘れずに


Raspberry Pi Zero Again(1) xxxx renamed from wlan0

 Raspberry Pi Zero w 2 とか w/whとか入手困難になってるので、

埃を被ってた w/o wifi の奴の OS新しくしてみました。

ちょっとwifiが特殊な設定なので、とりあえずwifiドングルを刺して起動

してみると、

rtl8192cu 1-1:1.0 wlx00a0009aa8ff: renamed from wlan0


てな感じで、勝手に変えられるんですね。(wlマックアドレス文字列)


ネットの情報だと、当該現象は多々あるようばんですが、

対処方法として特に多いのが、

/lib/udev/rules.d/ 配下に色々設定せよとのことでしたが

当該環境では解決せず、

結局、以下設定で解決しました。

net.ifnames=0 

/boot/cmdline.txt

の末尾に追加!!!

root@zero107:~# cat /boot/cmdline.txt

dwc_otg.lpm_enable=0 console=serial0,115200 console=tty1 root=PARTUUID=a9d07efd-02 rootfstype=ext4 elevator=deadline fsck.repair=yes rootwait net.ifnames=0

root@zero107:~#

これで、wlan0 renameされなくなりました

当該情報公開者に、感謝です。


2021年11月8日月曜日

Raspberry Pi Zero 2 W arrived!

 今日の午前中に届いたようです。(宅配ボックスに隠れてました)

今回は、英国から5営業日位で届きました。


とりあえず、電源入れてみた。

最低限の動作確認です。


[基本情報]

# vcgencmd version

Copyright (c) 2012 Broadcom

version 51215b4f6e3966401ecd99652a35cf1c25069113 (clean) (release) (start_cd)


# cat /proc/cpuinfo

processor       : 0

model name      : ARMv7 Processor rev 4 (v7l)

BogoMIPS        : 38.40

Features        : half thumb fastmult vfp edsp neon vfpv3 tls vfpv4 idiva idivt vfpd32 lpae evtstrm crc32

CPU implementer : 0x41

CPU architecture: 7

CPU variant     : 0x0

CPU part        : 0xd03

CPU revision    : 4


あと3 core


# cat /proc/meminfo


MemTotal:         486968 kB

MemFree:          351312 kB

MemAvailable:     393960 kB


うーん。最低1GBは欲しいですね。。。。


# cat /sys/devices/system/cpu/cpu0/cpufreq/cpuinfo_max_freq


1000000


控え目?!


# vcgencmd measure_temp


temp=44.0'C


結構熱い!!


定番の

[UNIX Benchmark]


========================================================================

   BYTE UNIX Benchmarks (Version 5.1.3)


   System: piz2w: GNU/Linux

   OS: GNU/Linux -- 5.10.63-v7+ -- #1459 SMP Wed Oct 6 16:41:10 BST 2021

   Machine: armv7l (unknown)

   Language: en_US.utf8 (charmap="ANSI_X3.4-1968", collate="ANSI_X3.4-1968")

   CPU 0: ARMv7 Processor rev 4 (v7l) (0.0 bogomips)


   CPU 1: ARMv7 Processor rev 4 (v7l) (0.0 bogomips)


   CPU 2: ARMv7 Processor rev 4 (v7l) (0.0 bogomips)


   CPU 3: ARMv7 Processor rev 4 (v7l) (0.0 bogomips)


   19:04:09 up 19 min,  1 user,  load average: 0.91, 0.58, 0.30; runlevel 5


------------------------------------------------------------------------

Benchmark Run: 月 11月 08 2021 19:04:10 - 19:33:18

4 CPUs in system; running 4 parallel copies of tests


Dhrystone 2 using register variables       14246429.6 lps   (10.0 s, 7 samples)

Double-Precision Whetstone                     4259.9 MWIPS (10.1 s, 7 samples)

Execl Throughput                               1757.7 lps   (29.9 s, 2 samples)

File Copy 1024 bufsize 2000 maxblocks        160829.8 KBps  (30.0 s, 2 samples)

File Copy 256 bufsize 500 maxblocks           43617.6 KBps  (30.0 s, 2 samples)

File Copy 4096 bufsize 8000 maxblocks        475423.0 KBps  (30.0 s, 2 samples)

Pipe Throughput                              534290.6 lps   (10.0 s, 7 samples)

Pipe-based Context Switching                  93582.7 lps   (10.0 s, 7 samples)

Process Creation                               3932.1 lps   (30.0 s, 2 samples)

Shell Scripts (1 concurrent)                   3687.7 lpm   (60.0 s, 2 samples)

Shell Scripts (8 concurrent)                    491.2 lpm   (60.3 s, 2 samples)

System Call Overhead                        1815146.0 lps   (10.0 s, 7 samples)


System Benchmarks Index Values               BASELINE       RESULT    INDEX

Dhrystone 2 using register variables         116700.0   14246429.6   1220.8

Double-Precision Whetstone                       55.0       4259.9    774.5

Execl Throughput                                 43.0       1757.7    408.8

File Copy 1024 bufsize 2000 maxblocks          3960.0     160829.8    406.1

File Copy 256 bufsize 500 maxblocks            1655.0      43617.6    263.6

File Copy 4096 bufsize 8000 maxblocks          5800.0     475423.0    819.7

Pipe Throughput                               12440.0     534290.6    429.5

Pipe-based Context Switching                   4000.0      93582.7    234.0

Process Creation                                126.0       3932.1    312.1

Shell Scripts (1 concurrent)                     42.4       3687.7    869.7

Shell Scripts (8 concurrent)                      6.0        491.2    818.7

System Call Overhead                          15000.0    1815146.0   1210.1

                                                                   ========

System Benchmarks Index Score                                         558.3


[os ver.]


# lsb_release -a

No LSB modules are available.

Distributor ID: Raspbian

Description:    Raspbian GNU/Linux 11 (bullseye)

Release:        11

Codename:       bullseye


とりあえず......


2020年9月29日火曜日

Boot Raspberry Pi 4 from USB (headless) 32 bit ver.

 正式にリリースされたか否か判りませんが、Raspberry Pi 4 の USB deviceからの

 bootを試してみました。

とりあえずbootしましたね。

#USB-C電源問題で話題になった初期の残念な1.1ボードなんですがね。。。

Hardware        : BCM2711
Revision        : c03111
Serial          : 
Model           : Raspberry Pi 4 Model B Rev 1.1


[やった事]

#apt update

#apt upgrade

#raspi-configコマンドで、

  B4 Boot Orderの方でUSB起動する設定

    B1 USB Boot  Boot from USB device if SD card fails   を選択

  B5 Boot ROM Version

   E1 Latest   Use the latest version boot ROM software を選択

再起動

以下コマンドで、USBデバイスにコピー

#rpi-clone -f -p 256M sda

SDカード抜いて、USBデバイスで起動

[設定(されてる)情報]

uname -a

Linux raspi4 5.4.51-v7l+ #1333 SMP Mon Aug 10 16:51:40 BST 2020 armv7l GNU/Linux

# vcgencmd bootloader_version

 Sep  3 2020 13:11:43

 version c305221a6d7e532693cc7ff57fddfc8649def167 (release)

 timestamp 1599135103

# cat /etc/default/rpi-eeprom-update

 FIRMWARE_RELEASE_STATUS="stable"

# cat /etc/os-release

PRETTY_NAME="Raspbian GNU/Linux 10 (buster)"

NAME="Raspbian GNU/Linux"

VERSION_ID="10"

VERSION="10 (buster)"

VERSION_CODENAME=buster

ID=raspbian

ID_LIKE=debian

HOME_URL="http://www.raspbian.org/"

SUPPORT_URL="http://www.raspbian.org/RaspbianForums"

BUG_REPORT_URL="http://www.raspbian.org/RaspbianBugs"

root@raspi4:~# vcgencmd bootloader_version

Sep  3 2020 13:11:43

version c305221a6d7e532693cc7ff57fddfc8649def167 (release)

timestamp 1599135103

# vcgencmd bootloader_config

[all]

BOOT_UART=0

WAKE_ON_GPIO=1

POWER_OFF_ON_HALT=0

DHCP_TIMEOUT=45000

DHCP_REQ_TIMEOUT=4000

TFTP_FILE_TIMEOUT=30000

ENABLE_SELF_UPDATE=1

DISABLE_HDMI=0

BOOT_ORDER=0xf41


#df -h

ファイルシス   サイズ  使用  残り 使用% マウント位置

/dev/root        3.4G  2.3G  1.1G   69% /

devtmpfs         1.9G     0  1.9G    0% /dev

tmpfs            1.9G     0  1.9G    0% /dev/shm

tmpfs            1.9G  8.4M  1.9G    1% /run

tmpfs            5.0M  4.0K  5.0M    1% /run/lock

tmpfs            1.9G     0  1.9G    0% /sys/fs/cgroup

/dev/sda1        253M   54M  199M   22% /boot

tmpfs            388M     0  388M    0% /run/user/0


2020年3月31日火曜日

rpi-clone 4 Rasbian Buster option

最近知りました。
これで、Busterへのupgradeが楽になった。

The examples below show a /boot partition smaller than recommended for the recent Rasbian Buster release.
rpi-clone version 2.0.21 adds the -p option so the /boot partition can be resized at the same time
the root partition is resized to the end of the disk.
If you upgraded Stretch to Buster and are running with a small /boot,
then for the clone to have a resized /boot, run:

$ rpi-clone -f -p 256M sda

2020年3月26日木曜日

Show weather reports Controlling MAX7219 8x8 Matrix LED with Raspberry Pi

MAX7219 制御の8x8 Matrix LEDに天気情報を流すPython scriptです。


[MAX7219_matrix_weather3.py]

#!/usr/bin/env python3
# -*- coding: utf-8 -*-

import time
import argparse

from luma.led_matrix.device import max7219
from luma.core.interface.serial import spi, noop


import local_weather
import img_gen2


def text_get():

   text=local_weather.get_weather()
   return text

def main(n, block_orientation, rotate, inreverse):
    # create matrix device
    serial = spi(port=0, device=0, gpio=noop())
    device = max7219(serial, cascaded=n or 1, block_orientation=block_orientation,
                     rotate=rotate or 0, blocks_arranged_in_reverse_order=inreverse)

    text=text_get()
    image_list = img_gen2.text_img_gen(n, text)
    max_images = len(image_list)
    while True:
      for i in range(0, max_images):
         device.display(image_list[i].convert(device.mode))
         time.sleep(0.1)
#         time.sleep(0.5)


if __name__ == "__main__":
    parser = argparse.ArgumentParser(description='matrix_demo arguments',
        formatter_class=argparse.ArgumentDefaultsHelpFormatter)

    parser.add_argument('--cascaded', '-n', type=int, default=4, help='Number of cascaded MAX7219 LED matrices')
#    parser.add_argument('--block-orientation', type=int, default=0, choices=[0, 90, -90], help='Corrects block orientation when wired vertically')
    parser.add_argument('--block-orientation', type=int, default=-90, choices=[0, 90, -90], help='Corrects block orientation when wired vertically')
#    parser.add_argument('--rotate', type=int, default=0, choices=[0, 1, 2, 3], help='Rotate display 0=0°, 1=90°, 2=180°, 3=270°')
    parser.add_argument('--rotate', type=int, default=2, choices=[0, 1, 2, 3], help='Rotate display 0=0°, 1=90°, 2=180°, 3=270°')
    parser.add_argument('--reverse-order', type=bool, default=False, help='Set to true if blocks are in reverse order')

    args = parser.parse_args()

    try:
        main(args.cascaded, args.block_orientation, args.rotate, args.reverse_order)
    except KeyboardInterrupt:
        pass


[img_gen2.py]

#!/usr/bin/env python3
# -*- coding: utf-8 -*-

from PIL import Image
from PIL import ImageDraw
from PIL import ImageFont

_WIDTH=8

def text_img_gen(n, text):

    text_len=len(text)
    image = Image.new('1', (text_len*8, 8))
    draw  = ImageDraw.Draw(image)
    font  = ImageFont.truetype("/home/pi/font/misakifont/misaki_gothic.ttf", 8, encoding='unic')
    draw.text((0,0), text, font=font, fill=255)

    image_list = horizontal_scroll(n, image)
    return image_list

def horizontal_scroll(n, image, padding=True):

        image_list = list()
        width = image.size[0]
        w, hight = image.size

        # Scroll into the blank image.
        if padding:
            for x in range(n*_WIDTH):
                section = image.crop((0, 0, x, hight))
                display_section = create_blank_image(n, hight)
                display_section.paste(section, (_WIDTH*n - x, 0, _WIDTH*n, hight))
                image_list.append(display_section)

        #Scroll across the input image.
        for x in range(8*n, width + 1):
            section = image.crop((x - _WIDTH*n, 0, x, hight))
            display_section = create_blank_image(n, hight)
            display_section.paste(section, (0, 0, _WIDTH*n, hight))
            image_list.append(display_section)

        #Scroll out, leaving the blank image.
        if padding:
            for x in range(width - (_WIDTH*n-1), width + 1):
                section = image.crop((x, 0, width, hight))
                display_section = create_blank_image(n, hight)
                display_section.paste(section, (0, 0, ((_WIDTH*n)-1) - (x - (width - ((_WIDTH*n)-1))), hight))
                image_list.append(display_section)

        #Return the list of images created
        return image_list

def create_blank_image(n, hight):
      return Image.new("RGB", (_WIDTH*n, hight))


[local_weather.py]

#!/usr/bin/env python3
# -*- coding: utf-8 -*-

import re
import json
import requests

#import sys
#sys.dont_write_bytecode = True

def get_weather():
#  url = 'http://weather.livedoor.com/forecast/webservice/json/v1'
  url = 'https://weather.tsukumijima.net/api/forecast'    ### 2021/2/21 update
  # 東京のcityタグのid
  payload = {'city': '130010'}
  # 天気情報をjsonで取得
  try:
     data = requests.get(url, params = payload).json()
  except Exception as e:
#     return e
     return '天気情報がありません'


  # 天気情報をedit
  rt=''
  max_len=len(data['forecasts'])
# 今日、明日、(明後日)の情報
  for forecast in data['forecasts']:
     rt+=('{0} ({1}) '.format(forecast['date'], forecast['dateLabel']))
     rt+=(' {} '.format(forecast['telop']))
     if forecast['temperature'].get('max') is not None:
        rt+= ('最高気温 {}℃  '.format(forecast['temperature']['max']['celsius']))
        rt+= ('最高湿度 {}% '.format(forecast['temperature']['max']['fahrenheit']))
     if forecast['temperature'].get('min') is not None:
        rt+= (' 最低気温 {}℃  '.format(forecast['temperature']['min']['celsius']))
        rt+= (' 最低湿度 {}% '.format(forecast['temperature']['min']['fahrenheit']))
     rt += ('{}の天気は、{}でしょう '.format(forecast['dateLabel'], forecast['telop']))

  rt+=('以降が{}の天気概況 '.format(data['location']['city']))
  rt+=(' ' + data['description']['text'])
  rt=re.sub(r'\n|。|、', "", rt)
  return rt

if __name__ == '__main__':
   rt=get_weather()
   print(rt)

2020年2月23日日曜日

Using 8x8 Dot Matrix LED with Raspberry Pi & Cascade Connection


MAX7219 Arduino用ドットマトリクスモジュール4-in-1ディスプレイ5pinライン 

てのを衝動買いしてしまったので、Raspberry Piで試してみました。


3.3Vで動きましたね

配線
MAX7219 Pin Name Remarks RPi Pin RPi Function
1 VCC +5V Power      1 3.3V
2 GND Ground             6 GND
3 DIN Data In            19 GPIO 10 (MOSI)
4 CS Chip Select        24 GPIO 8 (SPI CE0)
5 CLK Clock             23 GPIO 11 (SPI CLK)


ライブラリは以下のを使用させて頂きました。

https://github.com/rm-hull/luma.led_matrix


# git clone https://github.com/rm-hull/max7219.git
# cd max7219
# python3 setup.py install


[sample script]

#!/usr/bin/env python3
# -*- coding: utf-8 -*-

import time
import argparse

from luma.led_matrix.device import max7219
from luma.core.interface.serial import spi, noop


from PIL import ImageFont
font  = ImageFont.truetype("/home/pi/font/misakifont/misaki_gothic.ttf", 8, encoding='unic')

from PIL import Image
from PIL import ImageDraw
from PIL import ImageFont

_WIDTH=8

def horizontal_scroll(n, image, padding=True):

        image_list = list()
        width = image.size[0]
        w, hight = image.size

        # Scroll into the blank image.
        if padding:
            for x in range(n*_WIDTH):
                section = image.crop((0, 0, x, hight))
                display_section = create_blank_image(n, hight)
                display_section.paste(section, (_WIDTH*n - x, 0, _WIDTH*n, hight))
                image_list.append(display_section)

        #Scroll across the input image.
        for x in range(8*n, width + 1):
            section = image.crop((x - _WIDTH*n, 0, x, hight))
            display_section = create_blank_image(n, hight)
            display_section.paste(section, (0, 0, _WIDTH*n, hight))
            image_list.append(display_section)

        #Scroll out, leaving the blank image.
        if padding:
            for x in range(width - (_WIDTH*n-1), width + 1):
                section = image.crop((x, 0, width, hight))
                display_section = create_blank_image(n, hight)
                display_section.paste(section, (0, 0, ((8*n)-1) - (x - (width - ((8*n)-1))), hight))
                image_list.append(display_section)

        #Return the list of images created
        return image_list

def create_blank_image(n, hight):
      return Image.new("RGB", (_WIDTH*n, hight))


def main(n, block_orientation, rotate, inreverse):
    # create matrix device
    serial = spi(port=0, device=0, gpio=noop())
    device = max7219(serial, cascaded=n or 1, block_orientation=block_orientation,
                     rotate=rotate or 0, blocks_arranged_in_reverse_order=inreverse)


    text = "春はあけぼの やうやう白くなり行く、山ぎはすこしあかりて、むらさきだちたる雲のほそくたび きたる 夏は夜 夏は夜月のころはさらなり やみもなほ、ほたるの多く飛びちがひたる また、ただ一つ二つなど、ほのかにうち光りて行くもをかし 雨など降るもをかし"
    text_len = len(text)
    image = Image.new('1', (text_len*8, 8))
    draw  = ImageDraw.Draw(image)
    font  = ImageFont.truetype("/home/shin/font/misakifont/misaki_gothic.ttf", 8, encoding='unic')
    draw.text((0,0), text, font=font, fill=255)

    image_list = horizontal_scroll(n, image)
    max_images = len(image_list)
    while True:
      for i in range(0, max_images):
      #   device.display(image_list[i].convert(device.mode))
         device.display(image_list[i].convert('1'))
#         time.sleep(0.1)
         time.sleep(0.5)


if __name__ == "__main__":
    parser = argparse.ArgumentParser(description='matrix_demo arguments',
        formatter_class=argparse.ArgumentDefaultsHelpFormatter)

    parser.add_argument('--cascaded', '-n', type=int, default=4, help='Number of cascaded MAX7219 LED matrices')
    parser.add_argument('--block-orientation', type=int, default=-90, choices=[0, 90, -90], help='Corrects block orientation when wired vertically')
    parser.add_argument('--rotate', type=int, default=0, choices=[0, 1, 2, 3], help='Rotate display 0=0°, 1=90°, 2=180°, 3=270°')
    parser.add_argument('--reverse-order', type=bool, default=False, help='Set to true if blocks are in reverse order')

    args = parser.parse_args()

    try:
        main(args.cascaded, args.block_orientation, args.rotate, args.reverse_order)
    except KeyboardInterrupt:
        pass